Basics
About
SPACES offers high-end interiors for staging your art or photography. We provide a Photoshop template (PSD file) for each room that allows you to insert your art and customize its frame. All templates include lighting and color adjustments to blend your art seamlessly into the room.
What’s Included
Each SPACES room consists of a JPG (for easy room previewing) and a PSD file (for inserting your artwork into the room). If you purchased a room pack, you should have 10 JPGs and 10 PSDs.
Opening PSD Files
PSD files can be opened using SPACES Studio, Adobe Photoshop, Photopea, Canva, GIMP, or Procreate. We recommend using either SPACES Studio (free, easiest), Photoshop, or Photopea (free). We do not recommend using Canva, GIMP, or Procreate, because those programs discard many of the effects included in our templates and yield a less-realistic result. Our templates are NOT supported by Affinity Designer.
Using our templates in SPACES Studio
Inserting your art
Go to spacesmockups.com/studio and open the PSD file. You should now see the room displayed. Click on “Select Artwork” on the left-hand side to select artwork from your computer, and SPACES will automatically insert it into the room in a custom-fitted frame.

Customizing the frame
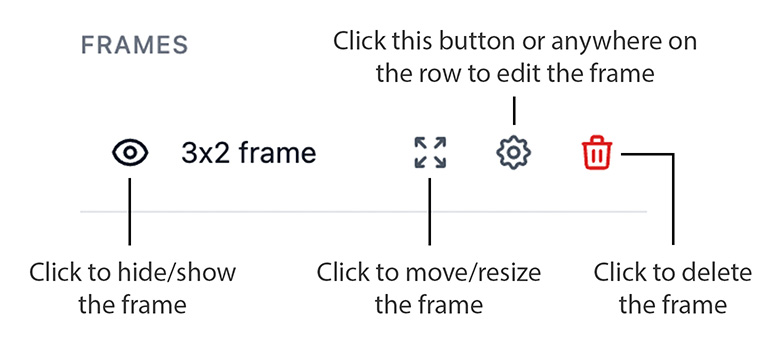
After inserting your art, you will notice new options on the left for customizing your frame. You can hide/show it, transform it (move/resize), edit it, or delete it. You can also click on the row itself to edit the frame.
When transforming a frame, you can hit the enter key on your keyboard to confirm your changes, or click the Confirm button in the transform bar at the top. Hit the escape key, or click Cancel, to cancel the transform.
In the “Edit Frame” view, you can change your artwork, change the frame style, change the frame color or lighting, or add a custom matboard.
Panning and Zooming
You can pan around the image by holding spacebar and clicking and dragging. You can zoom in and out using the buttons on the bottom-right corner, or by holding alt (PC) or option (mac) and scrolling.
Exporting
To export your final image, click on the Export button on the top right. It will export at highest resolution and in PNG format by default.

Using our templates in Photoshop / Photopea
Understanding the template
Our PSD files have the following structure in the Layers panel:

- foreground: This layer (sometimes a layer group) contains all room elements that are in front of the frame (e.g. plants, pillows, vases, etc.)
- 3×2/4×3/5×4/1×1/4×5/2×3/3×4 frame: All PSD files come with seven default frames, each in their own layer group. ‘3×2’ refers to the width-to-height ratio of the frame, meaning if your real-world artwork measures 30 inches (width) by 20 inches (height), it will have dimensions of 3×2. You should choose a frame that corresponds to your artwork’s dimensions and work exclusively inside that layer group. Click the eyeball to hide a frame, and click on one of the checkboxes to show a different frame. If you won’t be using a frame, feel free to delete it, which will also reduce the size of your PSD file. Note: You cannot move/resize these layer groups, see the next section for how to do that.
- space: This layer is the image of the room.
Once you expand a layer group, you will see the following. You can ignore every layer except for “adjustable frame” – that’s the layer group you will need to open to bring in your artwork. It’s also a group that you can move/resize to adjust your frame.

- room blending layers: The purpose of these layers is to apply lighting and color corrections to the frame to make it blend in with the room and look more realistic. You can experiment with disabling them or lowering their opacity. For example, if you think that the frame looks too dark, try lowering the opacity of the last one (the one right above the ‘adjustable frame’ group).
- adjustable frame: This is the layer group that contains the frame and artwork. It is also adjustable, meaning you can move or resize the frame by selecting the group and pressing CTRL+T (Windows) or Command+T (Mac).
- shadow: Ignore this layer. It contains the frame’s shadow, and is linked to the “adjustable frame” layer so that if you move/resize the frame the shadow will automatically move/resize with it.
Once you expand the “adjustable frame” layer group, you will be able to access the “artwork” layer (labeled in green), which you can modify to insert your artwork into the room (see next section).

- frame: This layer contains the frame. You can change the frame color by double-clicking the “Color Overlay” effect.
- inner shadow: This layer contains the frame’s inner shadow.
- mat: This optional layer contains the matboard for the frame. You can click the eyeball icon to turn it on/off, or change its color by double-clicking the “Color Overlay” effect (see Hidden Effects in troubleshooting section below if you can’t find it).
- artwork: This layer contains the artwork within the frame. Do not delete this layer. To replace the artwork with your own, see the next section.
Inserting Your Artwork
After choosing your frame dimension and expanding it (e.g. “3×2 frame”), expand the “adjustable frame” group and find the “artwork” layer (labeled in green).

To replace the artwork with your own, double-click the thumbnail to open the smart object. In the new window, drag and drop your design in there and press the “Enter” key after making size/position adjustments. Make sure the edges of your artwork touch the edges of the document. To bring back the adjustment controls, hold down Control (Windows) or Command (Mac) and press the “T” key.


Then save the document (“File>Save”, or CTRL/CMD+S) and close it to return to the original PSD file. The changes will be automatically reflected, and your artwork will appear integrated into the room.
Moving/Resizing the Frame
You cannot move/resize the top-level frame group (e.g. “3×2 frame”), you must move/resize the “adjustable frame” group inside of it instead.
To do that, open the top-level frame group (e.g. “3×2 frame”), find and click on the “adjustable frame” group, press Command (Mac) or Control (PC) + T (or go to Edit > Transform) to enable the transform tool, then use the tool to shrink/grow or reposition the frame.
Duplicating/Copying Frames
To create a copy of a frame, do not simply duplicate or copy/paste it. That will cause the new group to be linked to the original one, and modifying the artwork in one will modify it in the other.
The way to do this is to right-click the frame group and select “Convert to Smart Object”, then right-click the new smart object and select “New Smart Object via Copy”. You should now have two smart objects – one corresponding to your original frame, and one corresponding to the new copied frame. Right-click each smart object and choose “Convert to Layers” to convert them both back into groups. Finally, select each group and change the blend mode from “Normal” to “Pass Through”.
Options: Adjusting Colors
Some rooms have an adjustable room color feature. You will know the option is available if there is a blue “adjust color (<COLOR>)” adjustment layer above the “space” layer.

Toggle the layer’s visibility to “turn on” the layer and change the living room color.


Troubleshooting
If you are facing any difficulty using room templates or have questions in general, please do not hesitate to reach out for support. You can message us directly here, on Instagram (@spacesmockups), or by email at support@spacesmockups.com.
Here are some common issues below:
- Hidden Effects: In some cases, layer effects inside the adjustable frame are hidden. To view them, you can simply expand the layer by clicking on the right-most chevron.

- Artwork Color Changes: In some cases, when you bring your artwork into the room, it will change color (i.e. become redder, or blue-er, or greener). This is likely caused by color management issues with your image. To debug this, try opening your image in a new Photoshop document (File > Open, select your image). In the bottom left corner, click the chevron icon to open the document display menu and select “Document Profile”.

If your document has the color space “Untagged RGB”, that means the file does not include any information about how to display its colors.
![]()
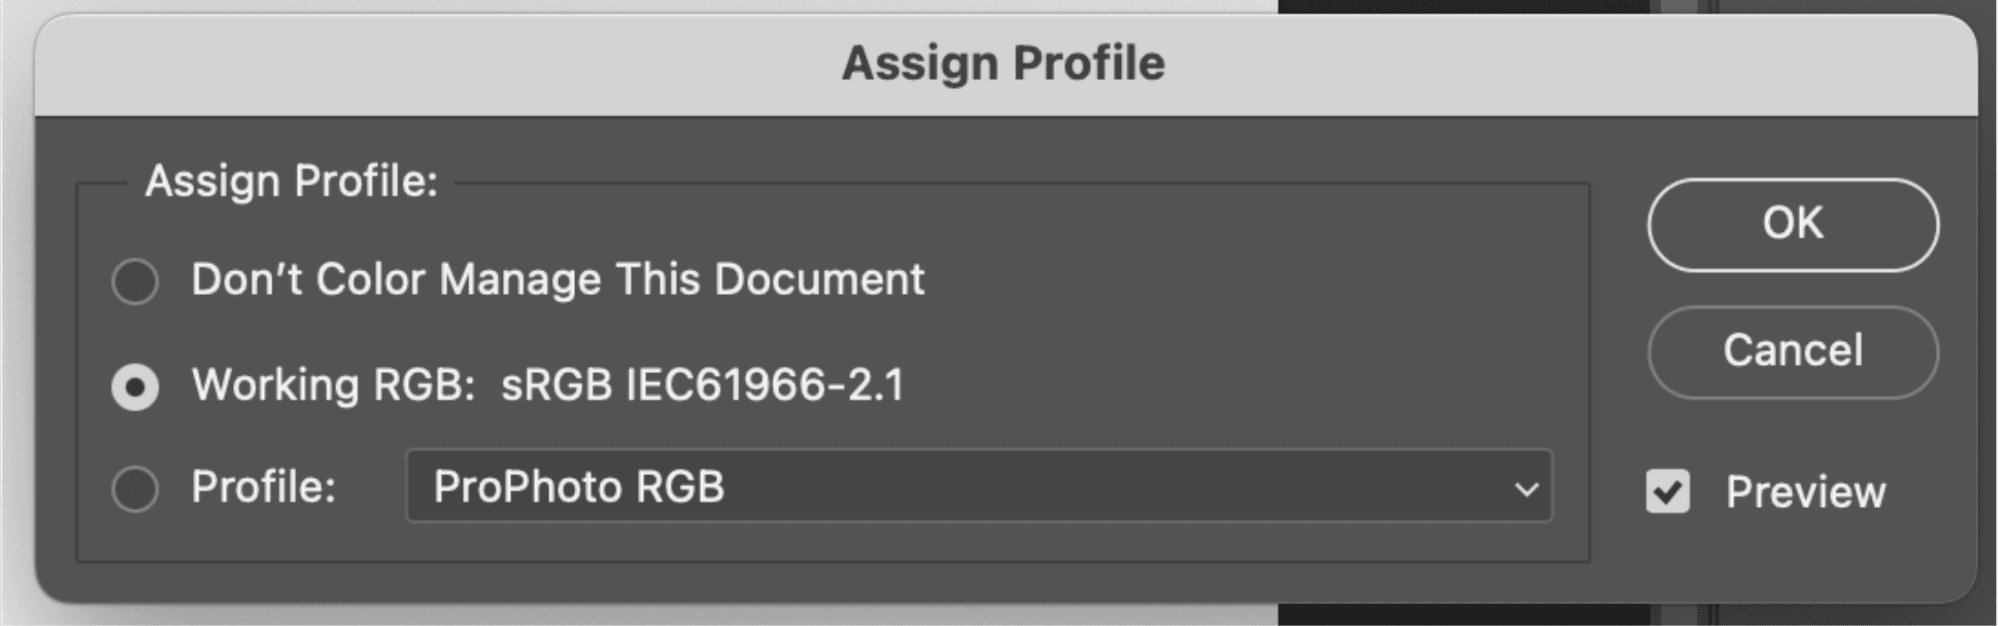
To resolve this, go to Edit > Assign Profile, and select a color space for your image. If you don’t know what to choose, you can go with sRGB IEC61966-2.1 (if it is not displayed next to the second option “Working RGB”, choose the third option and select it from the drop down menu).
Click OK and save your image. You can now close it, and try bringing your image back into the room template, and the color won’t change anymore.